Ultimate 3D Printing Guide
Why is Proper 3D Filament Storage and Care Needed?
What is Wet Filament?
By: Eric Franck
Taking care of your 3D printers' filament is a needed step in proper use of your machine, filament is known to absorb moisture in the air and make the filament “wet”. Wet filament is not good, it can lead to print deformations, failures, and even printer damage! Not to worry, you can check to see if your filament is wet.
How to Identify Wet Filament
- When printing if you hear a consistent "pop" noise when the filament is extruding.
- When handling your filament it breaks easily.
- Noticing whisps of steam when loading/ unloading filament.
- Noticing a more than usual amount of stringing.
- A rough external finish on parts.
Why Does Wet Filament Matter?

Every filament absorbs moisture differently, the most suspectable filaments to absorbing moisture are: PLA, Nylon, CF, PVA, ABS, PC, and TPU. Nylon, CF, and PC. The most notorious filaments can become unusable only after a few hours in a humid environment. PLA, ABS, TPU and PETG also absorb moisture from the air, but are more resistant. Wet filament is no good, although you can dry it. There are many ways to do this, some methods are DIY and some you can buy. Let us first go over some common DIY methods to dry your filament.
What are my Options for Drying Filament?
| Material | Glass Transition Temp | Melting Temp |
|---|---|---|
| PLA | 60-65 °C | 155 °C |
| ABS | 105 °C | 220 °C |
| PETG | 80-28 °C | 210 °C |
| Nylon | 70-80 °C | 217 °C |
| ASA | 100 °C | 250-260 °C |
| PC (Poly Carbonate) | 147 °C | 260 °C |
| HIPS | 88-92 °C | 180-270 °C |
| TPE/TPU | 60-130 °C | 150-210 °C |
You can use your ordinary oven to dry filament, although be warned some materials such as ABS can produce carcinogenic fumes, in short not something you want in your oven. When drying filament in an oven the general idea is to heat the filament to its “glass transition temperature” which is when the filament goes from hard to soft like a cooked spaghetti noodle. It is important to not go any hotter than glass transition temperature which can usually be found in the safety data sheet (SDS) on the manufacturer's website, or you can use a general temperature guide.(results may vary)
The variation in the temperatures is due to some manufacturers adding additives to make the material behave differently which is why we recommend looking at the suppliers SDS. When the temperature is reached, place the filament inside the oven and bake it for 5-6 hours and print, repeat if necessary.
In the community many makers have repurposed food dehydrators. To do this you need a food dehydrator with plastic racks. Take the plastic racks and cut out the inner tray portion so you have a hollow stackable ring. Christopher Lum on YouTube made an excellent video explaining this process. Repeat the process for all but one so your filament can be placed on something. If your dehydrator has temperature settings use the glass transition temperature of your material. You should expect to see impressive results overnight, repeat if needed.

There are many companies that make filament dehydrators for easy consumer use. One of these companies is PrintDry they make a product called the “PrintDry Filament Dryer PRO” which is available for purchase on our website here. This dryer has room for 2, 1kg spools. Using the dryers UI, you can set the temperature and runtime of the drying process. A useful feature this dryer has is passthrough holes so you can keep your filament in a dry environment while printing!
There are other filament dryers such as ones sold by SUNLU and ESUN unfortunately some users report great success and some report subpar perfomance- your results may vary. Click the button for more info on Filament Dryers.
Filament Storage and Care
Now that you have dry filament you need a place to store your filament. If you bought a filament dryer usually you can keep your spools in there and print from it. If you have multiple spools you need to keep dry you can use a “dry box” which is an airtight humidity-controlled environment. There are many DIY methods to this. A very popular method of DIY dry boxes takes a storage tote, a wooden dowel, and some 3D printed rod holders along with some reusable desiccant.

You can find excellent guides for DIY dry boxes all over the internet but a notable one we would like to mention is on Instructables.com by “bekathwia” seen here. The guide goes over what is needed to assemble the dry box as well how to assemble it step by step with pictures and videos along the way.
If you don’t have the itch to make a DIY dry box, there are many reputable solutions available for purchase. PrintDry also has a vacuum sealed container available for purchase here on our website in a pack of 5. These vacuum sealed containers prevent moisture in the air from getting to your filament inside. Take note that with this product you cannot print out of due to its airtight design.
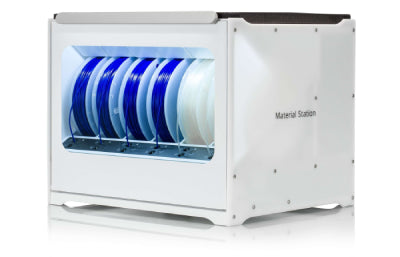
The forethought required to select and dry filament for every print is a hassle and it’s why we are a big fan of multi-spool loading systems. One of our favorite filament loading and storage systems is the Material Handling Station from UltiMaker specifically designed for the S5. The Material Handling Station is a seamlessly integrated unit that stores up to 6 spools of filament in a humidity controlled chamber featuring automatic material loading- giving you a more reliable and consistent 3D printing experience.
Having dry filament is important for quality prints and longevity of your 3D printer. Dry filament can save you from a lot of troubleshooting and headaches. A filament dryer is highly recommended investment DIY or not. On the other hand, dry boxes are an optional accessory. Dry boxes provide a convenient way to store filament in a controlled environment to help eliminate the need to dry your filament in the future. While a dry box is recommended, it is not required. Filament care is just as important as 3D printer maintenance, with proper care and maintenance you will have a better time printing as well as great results that you expect from your 3D printer.


