Laser Cutter Academy
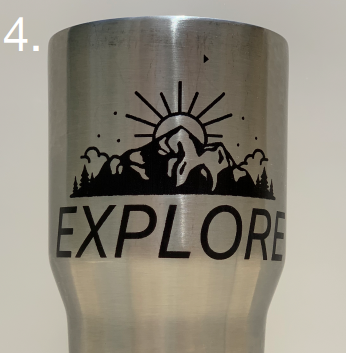
Laser Engraving On A Tapered Yeti Tumbler

Have you ever wanted to laser cut or engrave on a Yeti tumbler? Or maybe another cup that was tapered?
Custom 3d printing on cups can be a great gift for that special someone in your life, either for their birthday or the holidays.
If so you might have noticed you need to put the object you want to engrave on an even surface for your Beamo laser cutter. With the Beamo Rotary addon and our free 3D file download below this can easily be done.
In this 3d printing tutorial we will show you how to create a holder for tapered glass cups and tapered containers like Yeti. This 3d printer tutorial is for the Beamo Rotary add on only and will teach you how to 3d print. Custom 3D printing can be good for you and save you money on many other parts.
Engraving Round Objects With The Beamo Laser Engraving Rotary Addon
When laser engraving round objects on the Beamo Rotary, the Yeti tumblers are not level all the way around, they taper down smaller at the base of the cup. A laser cutter requires a level surface for engraving.

The bottom of the Yeti needs to be raised until the Yeti is level so that the laser cutter has a flat surface for engraving. The Yeti needs a simple attachment to raise up the bottom of the Yeti. So how do we do this? The answer is simple.

Free Download 3D File
This pre-made 3d printer file for the 30oz Yeti engraving attachment can be downloaded for free here and used to hold your yeti cup at an even angle.
(This 3d file will only work with FLUX Laser cutters, and cannot be opened by double clicking on the file, the 3d file must be 'dragged into Beam Studio or opened with the File > Open menu)
For Different Size Containers See the Instructions Below
But what if you have a different sized Yeti? Have no fear, a solution is near. All other sizes with unique dimensions can be created using the following instructions below:
Measure the Yeti using a tool such as digital calipers to measure the diameter of Yeti opening. Next, measure the base diameter of the Yeti.

In this case, the Yeti has dimensions of 97mm (at the top opening) and 75mm (base), so the difference is 22mm, (found by subtracting 75 from 97).
Creating the Attachment

Creating the YETI engraving attachment should be done in a CAD (computer aided design) software using exact dimensions.

After creating the engraving attachment in the CAD software, the engraving attachment can be laser cut out of an 1/8” wood sheet.

The attachment is “keyed” so that the small wooden block slides into the groove on the circle, ensuring the attachment will not slip.